Thursday, March 8, 2012

Update

It's been awhile, so here's an update of whats been going on the last month.

Since no matter what happens at the end of the month, I will be moving out of my apartment, and won't have my roommates coffee table (among other things: couch, tv, etc.), I bought a $20 coffee table from Goodwill. 


You can't really tell from this picture, but it was kind of a cherry color...which isn't my favorite.  The plan was to either stain it a darker color with less red, or paint it.  I decided painting would allow for more expression, so I went to Lowe's with that direction in mind. I will be using the leftover candlelit beige from the headboard project as the main color, and the light green/blue color from my dining room chairs as a chevron patter on top.  Yes, I'm alittle obsessed with the zig-zag/chevron pattern these days...

I bought a can of my favorite spray primer, an new knob for the little drawer, and some 1.5" painters tape.  These probably cost about $15 dollars total. 

It was time to get started, and the first step was to prime the table.  I removed the knob from the drawer and spread out my drop cloth and got to work.  The Bullseye 1 2 3 Spray Primer is really great!  It dries fast and goes a long way!


Once again, the wind was alittle too strong and blew my dropcloth back onto my still damp primed table, so I had to sand some places down again to make sure it was all smooth.  I then moved the table inside to put on 3 coats of the candlelit beige color.  I allowed 1 hour of dry time between each coat, and it turned out great.  You can't see this, but I didn't bother painting the inside of the drawer since it will stay closed.


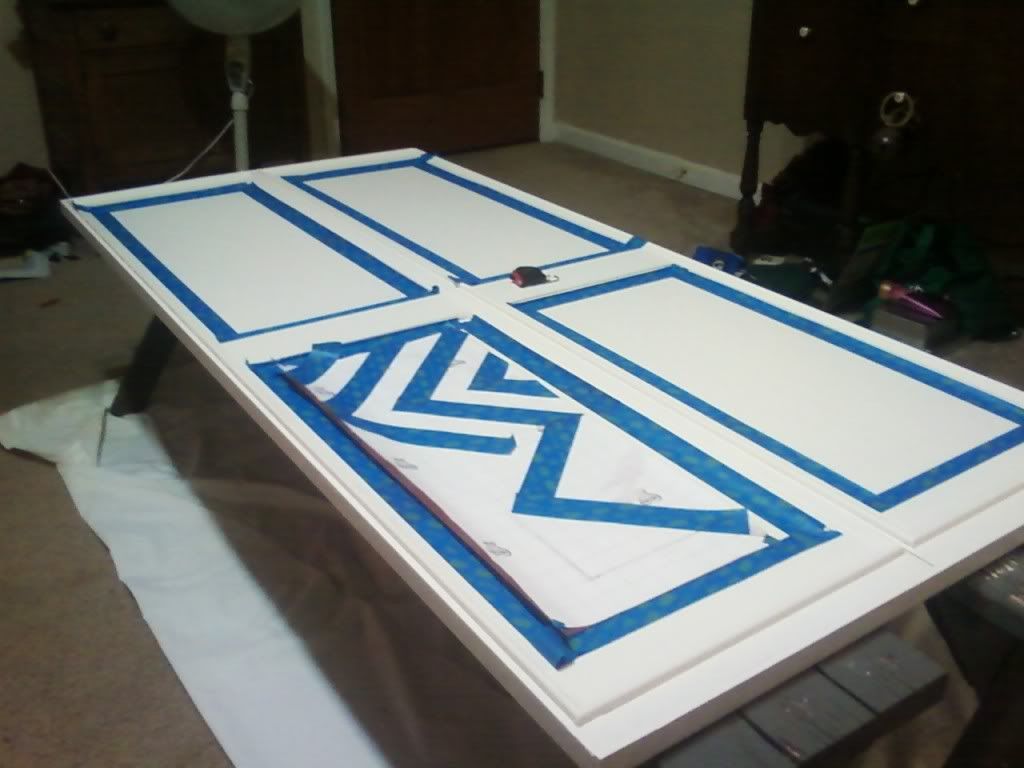
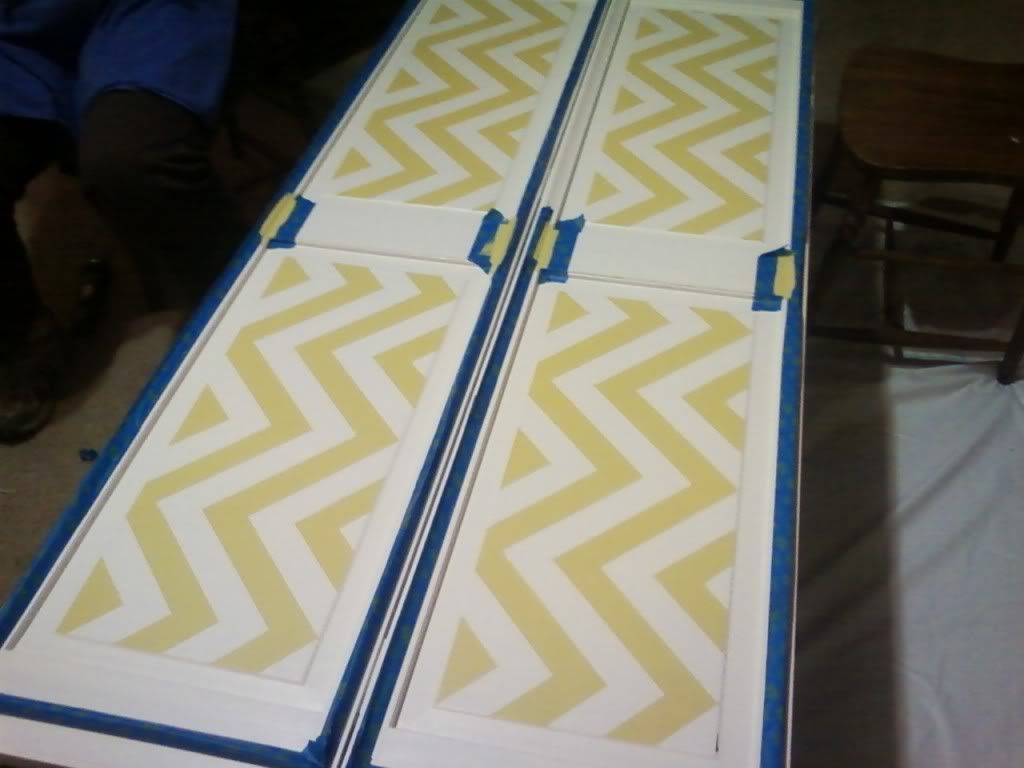
The next step was to measure and mark where my tape would need to go.  I used the same method we used for the headboard project (don't ask me how we came up with it).  I marked the center of the table, from there I marked every 2 inches.


Next, I measured over 5 inches from the center on each side and marked down 3 inches and then every 2 inches from that mark.  This created a bunch of staggered dots on the table.  I then moved 5 inches out from those marks and marked every two inches again. And over and over again until I ran out of table.  This created sort of a grid to apply my tape.


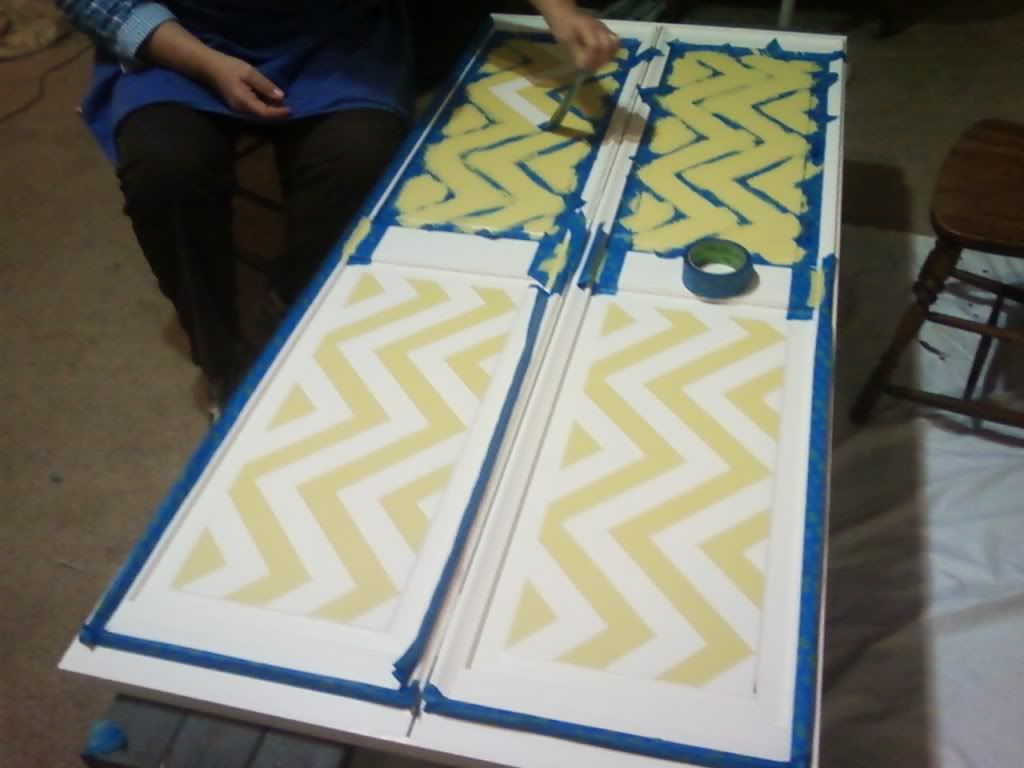
After I had all the tape down...which took FOREVER and was very tedious...I put two coats of the light green color I already from my dining table project.  You can see the color on the chairs at the edge of the picture above.  I wanted the pattern to be alittle muted and not as "BAM, Chevron pattern in your face!", so I went with a lighter color.  I don't know what sort of furniture I'll have in my next place, so I didn't want it to be too busy.


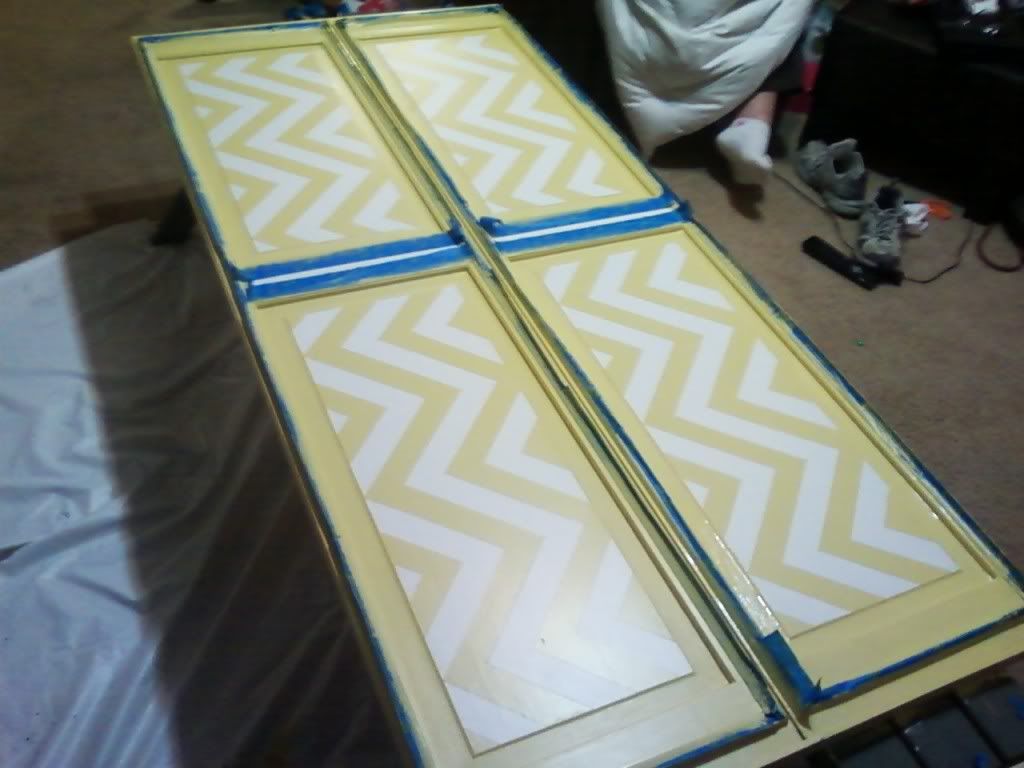
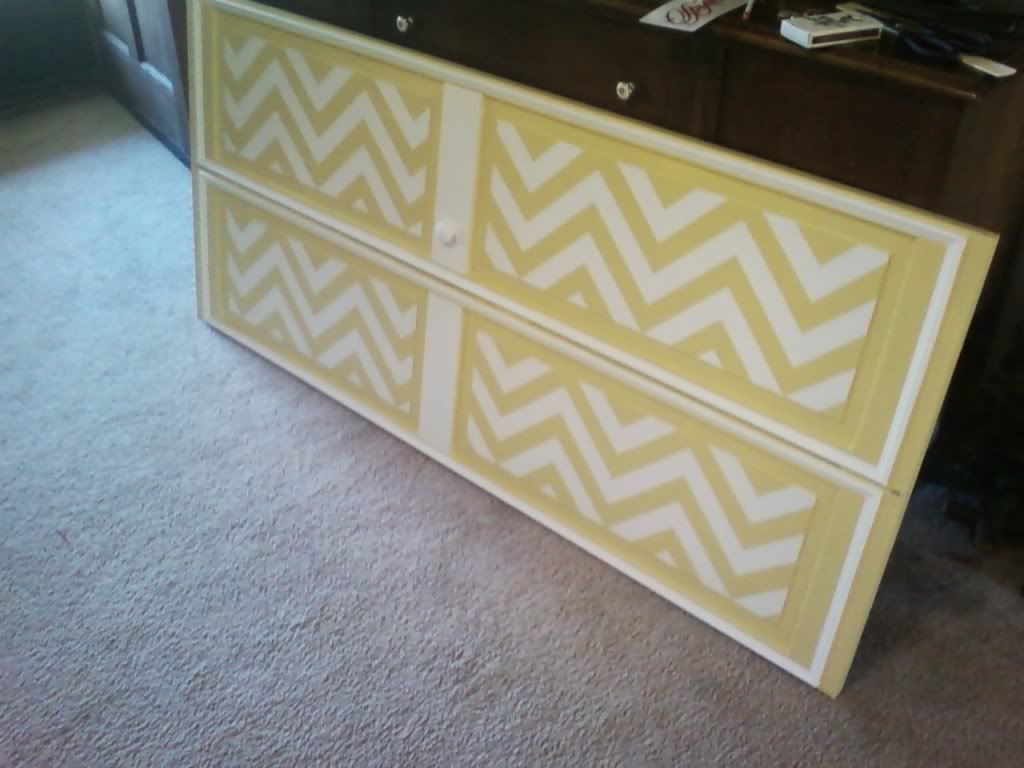
The next step, my favorite part, was to remove the tape for the final reveal.  And here it is!  You can tell that in different lights the color looks alittle darker, but I think the first photo is the most true to color.


All in all, I've very proud of my little table, and can't wait to put it in my living room...wherever that may be!  I'm on the lookout for some end tables with similar lines, so that I could paint them the same candlelit beige color and have a coordinating living room set.  So, after it was all said and done, I'd say I spend about $35 on my coffee table...not too bad.

Here are some other pictures I had on my phone from the last month:

Kate and I tried our hand at police sketches.  This is me and Kate is below.  They didn't have any good hairstyles, so that is why our hair looks so crazy.  Let's just hope we never have to help the police sketch anyone.  I did mine while looking at a picture of myself...


Ian's birthday dinner at Los Bravos Mexican Restaurant.  They brought out a dessert and sombrero and sang Happy Birthday!

And lastly, I managed to get a broom to balance straight up and down!  I noticed a few people on Facebook had been posting pictures of balancing brooms, and assumed it was something to do with the moon, or an equinox or something, so I had to try it.  Turns out it is just some trend going on where people balance their brooms, take a picture and post it to facebook.  Strange...  It was pretty weird looking tho!


Tuesday, January 17, 2012

We are all in agreement when we say that Cavalia Odysseo is one of the coolest things we've ever seen.  Between the acrobats and the beautiful horses, it felt like a once in a lifetime experience.  At one point my jaw would drop and I'd be asking myself, "how are they doing that?", and then 2 minutes later, I would be speechless at the pure beauty of the horses and their coordination and grace.   


Here's Kate looking all cute with her Stella and Dot brooch!


And another successful fire!


Great weekend! 

ps.  Lucy did great on her first roadtrip.  Except for when she got home...we think maybe the excitement may have been too much for her to handle. 

Thursday, January 12, 2012

hmmm

Well, I don't have much to talk about today.  This week hasn't been too exciting.  My days have mainly been - work, gym, dinner, and trying to get in bed early-ish.  Even though my week has been fairly boring, I did make strides for an exciting weekend yesterday.  I picked up our tickets for Cavalia's new show Odysseo.  It's basically Cirque de Soleil with horses!  They dropped the prices after the holidays by $23 dollars, making it alittle more affordable!


I cleaned my room last night in preparation for Momma, Daddy and Kate's arrival.  Actually, to be honest - I'm cleaning in preparation for Lucy's arrival.  Yes!  Lucy is coming to Atlanta!  This will be her first long roadtrip, so it will be quite an experience for all of us.  The problem is that if we kenneled her this weekend, she would have to be there 5 nights because of the holiday weekend.  So, she's making the trip. 


I'm sure she will be just perfect the whole time...

Thursday, January 5, 2012

onto the next...

I've got my eye on a craigslist item that could be my next project....or kept as is until I know exactly what I would want with it.  I think I'll go check it out on Saturday.  I wish they had two!!


There is also a matching ottoman for $15!

Wednesday, January 4, 2012

Cavalia Odysseo

Momma, Daddy, and Kate are planning to come up to Atlanta the weekend of the Martin Luther King holiday, and we are going to go to Cavalia's new show Odysseo!  Since I had never heard of this before the billboards started popping up in Atlanta, here is a brief run-down.  It is like Cirque-de-Soleil with horses! 
Per the summary: “Odysseo is a journey into the imagination, a voyage through space and time, and an exploration of nature’s greatest wonders – deserts, waterfalls, canyons, glaciers and more. The spellbinding show is a renewed tribute to the relationship humans and horses have forged over thousands of years. With our faithful companions by our side, we have travelled to the four corners of the globe, built bridges between cultures and brought people from all over the planet closer together. Odysseo is a singular expression and celebration of this exceptionally moving journey.”
Click here to go to the Cavalia Odysseo website to check out some videos of the show!

Wednesday, December 28, 2011

A very cool chevron headboard!

As you all know, this christmas was "Handmade Christmas" around the Jones house.  I'm trying to round up pictures of all our handmade gifts, but for now, I just wanted to run through the making of the headboard I got from Momma and Daddy. 

The headboard is made of a closet door they found at the Habitat ReStore in Valdosta.  They brought it home, added a few cross bars to make it sturdy and so that it wouldn't bend, and then they added alittle decorative molding.  Alittle primer later, and it was ready to gift.  They left it primed, so that I could pick out what I wanted to do with it.  Sooo, the first step was to find some inspiration.  For this - I took to the internet.  I've noticed lately one design that seems to be trending is the chevron pattern (aka zigzag), so I started searching for that and found this chair.  I have green-yellow (grellow) curtains, and navy blue pillow shams, so I was looking for something that would go with that.  I used this as my inspiration.


Next, Momma and I went to Lowe's to pick out colors.  I got Kathleen to send me a picture of my curtains and shams, so that we could use that to compare.


We decided to go with the green color for less of a "BAM! IN YOUR FACE ZIG ZAG!" vibe that the navy would have given off.  Once we got home, we painted on the base color which would tape over next.  The base color was called "Candlelit Beige" and basically white, but alittle warmer than if we had just gone with the whitest of white.  While this color was drying, we practiced our pattern on wrapping paper that we had cut out to the exact size of our board.  Once the candlelit beige was dry, it was time to tape.  And tape we did...all night it felt like...

Next, we painted on the green color.  This got two coats and then it was time to remove the tape - my favorite part!!


Here is what it looked like with all the tape removed.  Looking Good!


After we removed the tape, we added more tape!  We had to cover the molding and paint everything green except the decorative molding.  We wanted it to stay Candlelit Beige.


Once that dried, we removed the tape, and added the doorknob back on.  We thought that gave it alittle character and now you can't look at it without realizing it used to be a closet door.  


The one thing nobody wanted to say the whole time we were crafting it up was, "There is no way that is going to fit in your car, so it may have to wait weeks or months before it hangs over your bed!"  I had faith the whole time.  So, we put the seats down in my car and carried the headboard outside to see if it would fit.

and...IT DID!  What an amazing car!?  I could probably fit a hot water heater in there if I wanted to.  Sorry the picture is sideways (and blue for some reason), but that is the headboard...perfectly fitting inside my car!


And we all know that as soon as I got it home, I had to hang it up.  I can't have a headboard that cool just laying around my room.  So, I used our handy dandy Hangman hanger we got at Lowe's and hung it up.


Finally, I rehung the floral picture on the other wall, and the transformation from no headboard to headboard was complete.  I think it looks really great!


It looks really cool at night by lamp light, but my rinky dink phone won't capture it.  Don't worry - my Iphone arrives via FedEx tomorrow and my pictures will be 100 times better from here on out!  Notice the higher quality picture Kathleen sent me from her iphone?  It's the one of my curtains and sham.


Tuesday, December 20, 2011

You got to nip it in the bud!

I have some sad news...yesterday afternoon I started to feel a little tinge of soreness in my throat and throughout the day, it developed into full on sickness!  What terrible timing!  I went to the doctor today, and told her if I wasn't done with this sickness by Christmas, I was going to be mad!  I would prefer to be done by the time I wake up tomorrow, but that might be alittle too high hopes. She prescribed me a Z Pack and I'm picking it up today after work.  I plan to take some advice from Barney Fife and Nip it right in the bud!

Click on this link to watch a funny video of Barney Fife:
http://www.youtube.com/watch?v=de_P2aUZJyA